Blooming
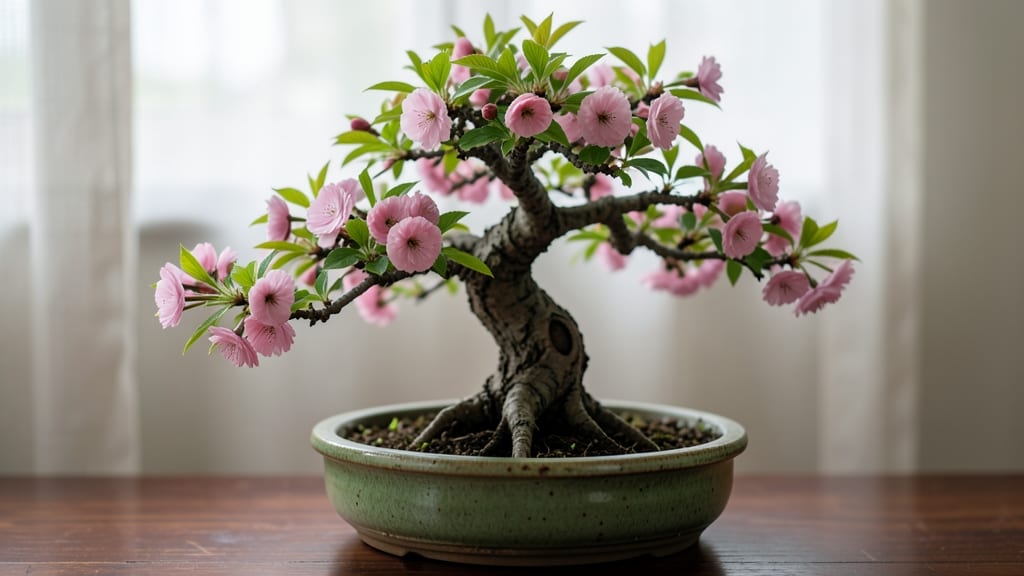
A cherry blossom bonsai tree brings Pacific Northwest charm to your home—those delicate pink blooms in miniature form. I remember the first time I saw one in person: the way the petals seemed to dance in the breeze, even when the tree was just a few inches tall.
That moment made me determined to grow my own, and now I'm sharing exactly how to create that same magic on your shelf or windowsill.
You'll need a few key things: a Prunus serrulata sapling (the classic cherry blossom species), a well-draining bonsai soil mix, and some basic tools like concave cutters and wire. The real secret isn't complicated—it's about patience and understanding how these trees naturally grow in the wild.
Even beginners can master the basics with the right approach, and within a few years, you'll have a tree that blooms reliably every spring.
What you'll end up with is a living piece of art that transforms your space. Imagine waking up to soft pink blossoms in late winter, their scent filling the air like a gentle reminder of spring.
The branches will develop natural curves, the bark will mature into beautiful textures, and you'll feel that quiet satisfaction of nurturing something truly special. It's not just a plant—it's a lifelong project that evolves with you.
This guide covers everything from selecting your first sapling to shaping it like a seasoned bonsai artist. We'll talk about seasonal care, including how to handle dormancy when the real cherry trees outside are losing their leaves.
Whether you're working with a sunny windowsill or a shaded corner, the techniques here adapt to your space. Let's get started on creating your own miniature cherry blossom masterpiece.
📚 In This Guide
- What you need
- Instructions
- Tips and common mistakes
- Wrapping up and next steps
What you need
- ● Cherry Blossom Bonsai Tree: Choose a Prunus serrulata (Japanese cherry) or a dwarf variety like Prunus ‘Snow Fountain’. Ensure it’s healthy with no signs of pests or disease.
- ● Bonsai Pot: 1 shallow, well-draining pot (6–12 inches wide) with drainage holes. Ceramic or unglazed clay pots work best.
- ● Bonsai Soil: 1 bag (5–10 lbs) of akadama, pumice, and peat moss mix (ratio: 50% akadama, 30% pumice, 20% peat).
- ● Gravel or Lava Rock: 1–2 lbs for the pot’s drainage layer.
- ● Pruning Shears: Sharp, precision bonsai shears (for trimming branches and roots).
- ● Root Hook: 1 stainless-steel hook for gently loosening and shaping roots.
- ● Wire Cutters: For removing training wires after shaping.
- ● Spray Bottle: 8–16 oz for misting leaves (especially in dry climates).
- ○ pH Tester: Optional but helpful for monitoring soil acidity (ideal: 5.5–6.5).
- ● Bonsai Wire: Copper or aluminum wire (1–3 mm gauge) for shaping branches.
- ● Humidity Tray: To create a microclimate for your bonsai.
- ● Fertilizer: Slow-release bonsai fertilizer or liquid feed (balanced NPK, 10-10-10).
- ● Decorative Elements: Miniature rocks, moss, or a small figurine for aesthetic touches.
Step-by-Step instructions for cultivating a cherry blossom bonsai
Here's how to grow a graceful, Pacific Northwest-inspired cherry blossom bonsai that thrives indoors.
Select and Prepare Your Tree
Start with a healthy cherry blossom seedling or young nursery tree (3-5 years old) with a sturdy trunk. I recommend choosing a tree with a slightly curved trunk—this natural character will become the foundation of your bonsai's elegance. Inspect the roots carefully; they should be white and fibrous, not brown or mushy, which would indicate rot.
Trim any overly long roots with clean, sharp scissors, leaving only the healthiest ones. This step is crucial because it encourages a stronger root system as the tree adjusts to its new bonsai environment. Place the tree in a shallow bonsai pot (6-8 inches wide) filled with well-draining bonsai soil mix—this blend prevents waterlogging, which is deadly for bonsai.
Position for Light and Humidity
Cherry blossom bonsai thrive in bright, indirect light, mimicking the dappled sunlight of a Pacific Northwest forest. Place your bonsai near an east-facing window or under a grow light for 12-14 hours daily. Direct sunlight can scorch the delicate leaves, so avoid placing it in a south-facing window without some shade.
Humidity is key—these trees love moisture in the air, just like their wild counterparts in misty forests. I place a humidifier nearby or set the pot on a tray filled with pebbles and water, ensuring the pot doesn’t sit directly in water. Mist the foliage lightly in the morning to simulate dew, but avoid wetting the soil directly—this can lead to fungal issues.
Water and Fertilize with Precision
Water your bonsai when the top inch of soil feels dry to the touch. Stick your finger into the soil—if it’s damp just below the surface, wait another day. Overwatering is the #1 killer of bonsai, so always check before adding more water. I use room-temperature water to avoid shocking the roots, and I water thoroughly until it drains from the bottom of the pot.
Fertilize every 2-4 weeks during the growing season (spring and summer) with a balanced liquid bonsai fertilizer diluted to half strength. This keeps the tree nourished without overwhelming its delicate system. In fall and winter, reduce fertilization to once a month—your bonsai enters a dormant phase, and too much food can harm it.
Prune and Shape for Elegance
Prune your bonsai in early spring before new growth begins. Use clean, sharp bonsai shears to trim back overgrown branches to encourage bushier growth. I like to shape the tree to mimic a natural, wind-swept form—think of how cherry blossoms grow along riverbanks in the Pacific Northwest, with branches cascading gracefully.
Pinch back new growth to 2-3 leaves per stem to promote branching. This step is where your bonsai’s character really develops. Wire the branches into place if needed, using aluminum bonsai wire wrapped gently around the trunk and branches. Remove the wire after 3-4 months to avoid scarring the bark.
Maintain and Enjoy Year-Round
In late winter, your bonsai may drop its leaves—this is normal and part of its dormancy cycle. Don’t panic; simply reduce watering and keep it in a cool but bright spot. When new buds form in early spring, increase watering and fertilization to support the burst of growth.
Display your bonsai where you can admire its delicate blossoms, but avoid drafts or sudden temperature changes. With patience and care, your cherry blossom bonsai will reward you with pink or white blossoms in spring, just like the iconic trees of the Pacific Northwest. This is the moment that matters—watch as the tiny flowers burst open, filling your space with fragrance and beauty.
Tips & tricks for perfect cherry blossom bonsai
Creating a thriving cherry blossom bonsai takes patience, but these small details make all the difference between a struggling plant and a stunning miniature masterpiece.
Tree Selection Tip: When choosing your cherry blossom seedling in Step 1, look for a tree with a slight natural curve in the trunk—this is called "jini" in bonsai culture. The more pronounced the curve, the more character your bonsai will have. I've found that seedlings with a gentle S-curve grow into the most elegant bonsai over time, especially when mimicking Pacific Northwest riverbank trees.
Lighting Strategy: The 12-14 hours of daily light in Step 2 is crucial, but don't just place your bonsai near any window. East-facing windows provide the perfect balance of morning sun without harsh afternoon rays. If using grow lights, position them 12-18 inches above the tree to mimic natural dappled light. I've noticed my bonsai develops richer foliage when I rotate the pot 90 degrees weekly to ensure even light exposure.
Pruning Technique: When pruning in early spring (Step 4), make your cuts just above a leaf node or bud to encourage new growth. For thicker branches, I like to make two cuts—first at a slight angle, then a second cut parallel to the first—to create a clean wound that heals better. Remember to sterilize your shears with rubbing alcohol between cuts to prevent spreading disease between branches.
Seasonal Care Transition: The shift from summer's 2-4 week fertilization to monthly in fall (Step 3) is where many bonsai owners struggle. I've learned to mark my calendar with seasonal reminders: reduce fertilization when daylight hours drop below 12 hours, and switch to a winter-specific bonsai fertilizer that's lower in nitrogen. This mimics the tree's natural dormancy cycle and prevents overfeeding during its resting period.
Pro Tips for Cherry Blossom Bonsai Tree
- Creating a thriving cherry blossom bonsai takes patience, but these small details make all the difference between a s...
- Tree Selection Tip: When choosing your cherry blossom seedling in Step 1, look for a tree with a slight natural curve...
- Lighting Strategy: The 12-14 hours of daily light in Step 2 is crucial, but don't just place your bonsai near any win...
Frequently asked questions
Got questions about nurturing your own cherry blossom bonsai tree? Here are some of the most common ones—plus expert tips to help you grow a stunning miniature masterpiece!
How long does it take for a cherry blossom bonsai tree to bloom?
A cherry blossom bonsai typically takes 3–5 years to produce its first flowers, depending on age, species (like Prunus serrulata or Prunus jamasakura), and care. Young trees focus on root/foliage growth, so patience is key! Pro tip: Choose a grafted bonsai (pre-blooming) to skip the wait.
Can cherry blossom bonsai survive winter in the Pacific Northwest?
Yes! These trees thrive in PNW’s mild winters (USDA Zones 5–8), but protection is needed for extreme cold (<32°F). Use a winter wrap or move potted bonsai to a sheltered spot. Avoid soggy soil—water sparingly and mulch lightly. Watch for: Frost cracks on bark (repair with pruning sealant).
What’s the easiest alternative if I want faster blooms?
Consider a pre-bonsai cherry tree (like a Sargent cherry) or a Japanese flowering cherry seedling trained into bonsai shape. These bloom sooner (1–2 years) but require similar care. For instant gratification, opt for a grafted bonsai—it’s pricier but already blooms!
Why are my cherry blossom bonsai leaves yellowing or dropping?
Yellow leaves often signal overwatering (check soil moisture—it should dry slightly between waterings) or nutrient deficiency (feed with balanced bonsai fertilizer in spring/summer). Brown edges? Underwatering or low humidity—mist leaves or use a humidity tray. Quick fix: Trim affected leaves and adjust care.
How do I style a cherry blossom bonsai for a Pacific Northwest aesthetic?
Embrace the PNW’s wild yet refined vibe with an informal upright (chokkan) or slanting (shakan) style. Add moss to the base, use driftwood for texture, and keep the pot rustic (unglazed clay). Prune branches to mimic natural layering—think soft, cascading petals like those in Seattle’s cherry blossom tunnels!
| Issue | Quick Solution |
|---|---|
| No blooms after 2 years | Check light (full sun), reduce fertilizer in fall/winter, and prune for airflow. |
| Pests (aphids/spider mites) | Spray with neem oil or rinse leaves with water. Isolate the tree if infested. |
| Slow growth | Repot every 2–3 years in spring, use well-draining soil, and fertilize lightly. |
Wrapping up and next steps
Cultivating a cherry blossom bonsai tree brings the serene beauty of the Pacific Northwest into your home—one delicate petal at a time! 🌸 With patience, the right tools, and a touch of creativity, you’ve unlocked the art of miniature elegance.
Whether you’re a beginner or a seasoned enthusiast, this tiny masterpiece will reward you with stunning blooms and a sense of accomplishment.
Ready to watch your bonsai flourish? Start by observing your tree’s growth and adjusting care as needed—like pruning in early spring or protecting it from harsh winds. Next, share your progress with fellow bonsai lovers or even host a mini tea ceremony under its blossoms!
The journey doesn’t end with planting—it’s about nurturing a living work of art.